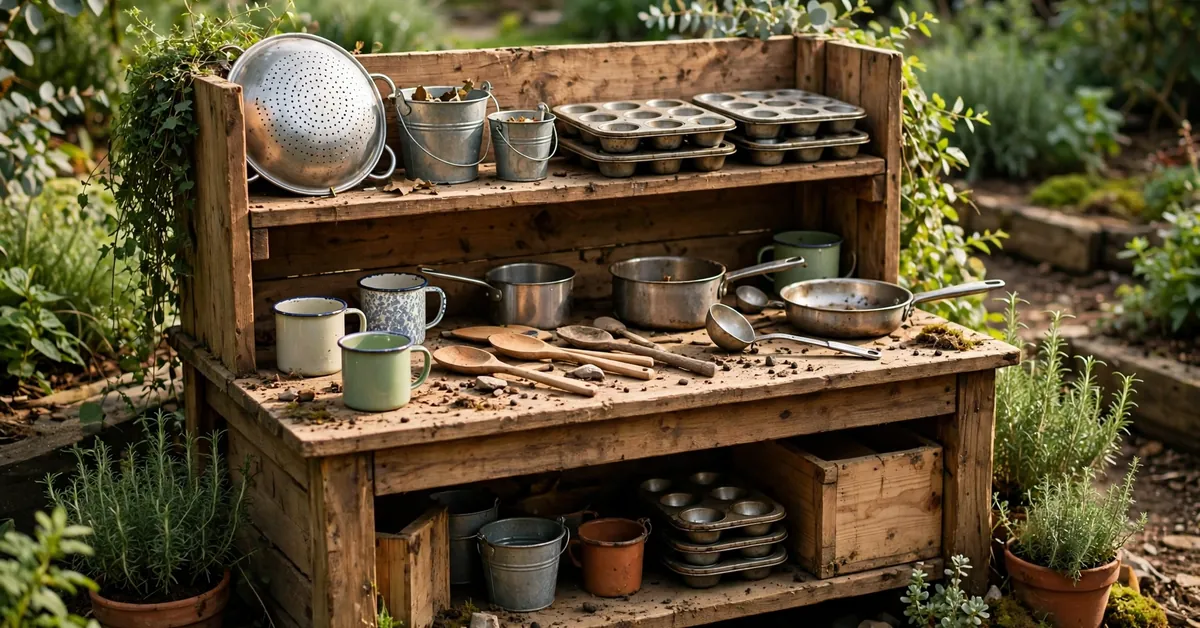
When I built our first mud kitchen, I spent a weekend on the pallet frame and about ten minutes thinking about what would actually go on it. Big mistake. The frame is just furniture — it’s the battered old saucepan, the wonky whisk and the bucket of pinecones that turn it into a restaurant, a science lab and a potion shop all before lunch.
The good news is that mud kitchen accessories are the cheapest part of the whole project. Most of the best ones are already sitting in your kitchen drawers, your recycling bin or a charity shop down the road. Below are the add-ons that have genuinely earned their place on our mud kitchen over the years, grouped by what they’re for, with honest notes on what’s worth buying and what you should never pay for.
First, a quick word on where to get this stuff
Before the list, my standing rule: check the thrift store, charity shop, car boot sale or your own cupboards first. Almost everything below is the kind of thing people donate in barely-used condition. The only items I’d suggest buying new are things that hold water (old taps and seals can leak) and anything a child under three will mouth. There’s a full section on second-hand hunting further down.
Cooking & baking accessories
This is the heart of mud kitchen play — the “cooking” is what most children come back to day after day.
- Old pots and pans. One large saucepan and one small one is the perfect start. Metal beats plastic here: it feels real, makes a satisfying noise, and survives being left out in the rain. Avoid anything with a loose or damaged handle.
- A muffin tin. The single most-used item on our kitchen. Mud pies, leaf cupcakes, pebble muffins — the compartments make everything feel like “real baking”. Metal tins last longest outdoors.
- Baking trays and cake tins. Flat trays become serving platters and pizza stones. A round cake tin makes a very convincing birthday cake once it’s packed with mud and decorated with petals.
- A whisk. Brilliant for potion-stirring and mud-soup frothing. Balloon whisks clog with mud; the flat spiral kind rinses clean in seconds.
- Ladles, slotted spoons and a potato masher. Long handles keep hands out of the worst of the slop, and a masher is oddly satisfying for squashing mud balls flat. Wooden spoons are cheap and fine, but they do eventually split if left outside — metal or sturdy plastic lasts longer.
- Mixing bowls. One big bowl for batch cooking, plus a couple of small ones for “ingredients”. Stainless steel is light, unbreakable and easy to hose down.
- Measuring cups and jugs. Sneaky early maths: filling, pouring and comparing volumes. A clear plastic measuring jug with markings is a lovely thing to have.
- An old kettle or teapot. For the serious mud-tea makers. Completely optional, endlessly charming.
Water play accessories
Water is what turns dry dirt into mud, so a few pouring tools multiply the fun enormously.
- A water container with a tap. The foundation of any mud kitchen with “running water”. A camping-style container or drinks dispenser (typically £10–£20 / $12–$25 new) lets children serve themselves and — just as importantly — turn it off. If you’re building your own setup from scratch, the free layouts in mud kitchen plans PDF show the simplest ways to mount one.
- Jugs and pitchers. At least two, different sizes. Small hands manage a 500ml jug far better than a full watering can.
- Funnels. Cheap, indestructible, and fascinating to three-year-olds. One wide-mouth funnel makes filling bottles and tubes much less frustrating.
- Tubes and guttering offcuts. A short length of guttering or a flexible tube becomes a water slide, a river or a delivery chute for mud balls. Sand the cut edges smooth.
- Spray bottles. Old (thoroughly washed) cleaning spray bottles or new plant misters. Great for “washing up”, dampening dry mud, and cooling down on hot days.
- Buckets. One proper bucket for hauling water, one for hauling mud. Colour-code them if you want to stay sane.
- A washing-up bowl or small tub. Doubles as a sink for dishes and a pond for floating leaf boats.
Storage & organisation
A mud kitchen without storage becomes a mud pile within a week. A few containers keep the accessories findable and the play going longer.
- Wooden crates. Sturdy, stackable, and they drain. Perfect for storing the nature ingredients below. A crate on its side is also a handy extra shelf.
- Hooks and a rail. Screwing a simple rail with S-hooks onto the back of the kitchen gets ladles, whisks and pans off the worktop and makes the whole thing look like a real kitchen. There’s a whole IKEA section on this below — rails are where IKEA really shines.
- Baskets. Woven or plastic baskets for collecting expeditions around the garden. Plastic survives the weather better; woven looks nicer and rots eventually.
- Stackable bins with lids. For storing “dry ingredients” — a bin of pebbles, a bin of shells, a bin of conkers in autumn. Lids matter: they keep the rain (and most of the slugs) out.
- A small shelf or spice rack. Somewhere for the potion bottles to live. Old spice jars and small bottles lined up on a shelf get used constantly.
Nature ingredients (the free section)
These cost nothing, change with the seasons, and are — honestly — played with more than anything we ever bought.
- Pinecones. Scales for dragon eggs, trees for a fairy garden, or just satisfying things to stir into soup. Collect them dry and they’ll keep for months in a crate.
- Pebbles and smooth stones. Muffin toppings, currency in the café game, and excellent for practising counting. Choose ones too big to be a choking hazard for your youngest player.
- Shells. If you live anywhere near a beach, a shell collection is free treasure. Rinse them well before they join the kitchen.
- Leaves, petals and herbs. The garnish department. Fallen petals, mint and rosemary snippings, and big leaves for wrapping “parcels”. Teach children to only use fallen material and plants you know are safe — avoid anything from the “unknown berries” category entirely.
- Sticks. Stirrers, rolling pins for mud dough, and construction material. Snap off any sharp points.
- Conkers, acorns and seed heads (autumn bonus). Wonderful seasonal ingredients — with one caution: conkers and acorns are not for eating and aren’t suitable for toddlers who still mouth things. Keep them for the over-threes.
Signs & decor
A mud kitchen with a sign is a café. A mud kitchen without one is just a wet bench. Children take the make-believe far more seriously once there’s a menu.
- A chalkboard sign. For the café name, today’s specials and some extremely ambitious pricing. One board on the front of the kitchen, or a small one propped on the worktop. If you want proper inspiration for this, the ideas in mud kitchen signs range from five-minute chalkboards to painted wooden signs.
- Bunting. A string of fabric or even paper bunting across the back instantly makes it feel like a place. Fabric lasts; paper is a one-party wonder.
- Labels and jar tags. Card labels tied to the ingredient bins (“magic beans” = pebbles) are lovely for early readers and writers.
Sensory extras
- Sieves and colanders. Shaking soil through a sieve to make “flour” is deeply absorbing work. A metal colander also makes a great pretend shower head for water play.
- Ice moulds and ice-cube trays. Freeze petals, leaves or small flowers in water overnight and hand over the ice blocks for melting, smashing and potion-making on a warm day. Silicone moulds release easiest.
- Old kitchen scales. The mechanical kind with a dial. Weighing mud pies against each other is a game in itself, and nobody minds when a £2 charity-shop scale gets muddy.
- A mortar and pestle (or a bowl and a smooth stone). For grinding herbs and petals into potions. A heavy one is a treasure; supervise younger children with it.
- Magnifying glass. Not strictly cooking equipment, but every mud kitchen eventually produces a worm, and then you’ll be glad of it.
The IKEA accessories that actually work
If you’ve built — or are thinking of building — the IKEA-hack version of a mud kitchen (IKEA mud kitchen), IKEA’s own kitchen and storage ranges are the easiest place to kit it out, because everything is sized for small hands and priced for real life. Based on what’s survived on ours, these are the IKEA lines worth knowing about (all typical prices vary by country, so treat the figures as rough guides):
- Storage boxes and bins (the FLISAT / TROFAST / GLIS style ranges). Small lidded boxes in the £1–£4 / $1–$5 range are perfect dry-ingredient stores, and the larger open tubs make excellent under-bench storage that slides in and out like drawers. The lidded ones keep rain out; the open ones are better for things that need to dry.
- Rails and hooks (the KUNGSFORS / HULTARP style ranges). A wall rail with S-hooks is the single best IKEA buy for a mud kitchen — typically £8–£15 / $10–$19 for a rail plus a few pounds/dollars for hooks. Screw it to the back panel and every pan, ladle and whisk has a home. It also teaches tidying better than any nagging I’ve tried.
- Containers and jars. Clear screw-top jars mean children can see the “ingredients”, which makes them far more likely to use them. Food-storage containers with clip lids survive drops that shatter cheaper boxes.
- The DUKTIG children’s kitchenware. IKEA’s toy pots, utensils and baking sets (sets typically £8–£15 / $10–$19) are properly sized for toddlers, made to be chewed on safely, and — unlike much toy kitchenware — metal and wood rather than flimsy plastic. If you have an under-three, this is the one range I’d buy new without hesitation.
- Small stools and crates. A low step stool doubles as a seat for the chef and a step up to the worktop for smaller children.
One caution with IKEA bits: the softwood items aren’t treated for outdoor life. Anything wooden that lives outside permanently will grey and eventually split — bring the fabric and wooden pieces under cover in winter, or accept a shorter life as the price of the bargain.
Thrift-store and free-first hunting (our favourite way)
This site has always been thrift-first — our most-read post ever is about the accessories we found in charity shops — because mud kitchen kit is exactly the stuff that fills second-hand shelves. Here’s how to hunt well:
Where to look: charity shops and thrift stores (kitchen aisle first, always), car boot sales and yard sales in spring when people clear sheds, freecycle and community giveaway groups, and your own kitchen — most households have a duplicate whisk and a saucepan with a wobbly lid that nobody loves.
What to grab on sight: stainless steel bowls and pans, muffin tins, metal colanders and sieves, wooden crates, mechanical scales, ceramic plant pots (for older children), and any sturdy jug. These appear constantly and cost very little — often £1–£3 / $1–$4 an item.
What to leave behind: anything with flaking paint (very old painted items can predate modern paint safety standards), cracked plastic that flexes white at the crack, non-stick pans with scratched or peeling coating, and glass of any kind if toddlers will use it.
Before anything joins the kitchen: wash it thoroughly in hot soapy water, check every edge with your thumb for sharpness, tighten or remove loose handles, and give metal items a quick once-over for rust spots — a light surface rust on a pan’s base is cosmetic, but flaky rust should be sanded off or the item skipped.
Safety notes (please read this bit)
Mud kitchens are gloriously low-risk play, but second-hand and homemade kit deserves five minutes of common sense:
- Choking hazards: pebbles, acorns, conkers, small shells and any ingredient smaller than a toilet-roll tube should stay away from under-threes. Supervise mouthing-age children closely.
- No real glass or thin ceramics for toddlers. Chips happen, edges are sharp. Enamel, metal and sturdy plastic only for the under-fives; save the pretty crockery for older children.
- Check second-hand items properly: sharp or bent edges, loose handles, splinters on wooden items, and — as above — flaking paint on genuinely old pieces.
- Water hygiene: empty standing water at the end of the day (it attracts insects and goes stagnant fast), and rinse water containers weekly.
- Garden ingredients: use only plants you can identify as safe, only fallen material, and keep the kitchen away from areas treated with slug pellets or weedkiller.
- Sun and slips: mud plus water makes slippery ground — a mat or a patch of bark underfoot helps, and even outdoor chefs need a hat and a drink on hot days.
If you buy only 8 things: the starter kit
Don’t feel you need all 33. Honestly, a mud kitchen runs beautifully on this shortlist, most of it second-hand:
- One big saucepan and one small one
- A muffin tin
- A large metal mixing bowl
- A ladle, a wooden spoon and a whisk
- A water container with a tap
- Two jugs (one big, one small)
- A crate or lidded bin for nature ingredients
- A bag of free ingredients: pinecones, pebbles and petals from your own garden
Add the chalkboard when the café gets its name, add the rail and hooks when the worktop gets crowded, and let the collection grow the way ours did — one charity-shop find at a time.
Final thoughts
The best mud kitchen accessories aren’t a matched set from a catalogue; they’re a jumble — a charity-shop saucepan, a hand-me-down whisk, a crate of this autumn’s conkers. Start with the eight things above, raid your own drawers before you spend anything, and upgrade slowly as you see what your children actually cook. In our experience, the saucepan lid that doubles as a shield will outlast and out-play anything shiny. Happy mud cooking.