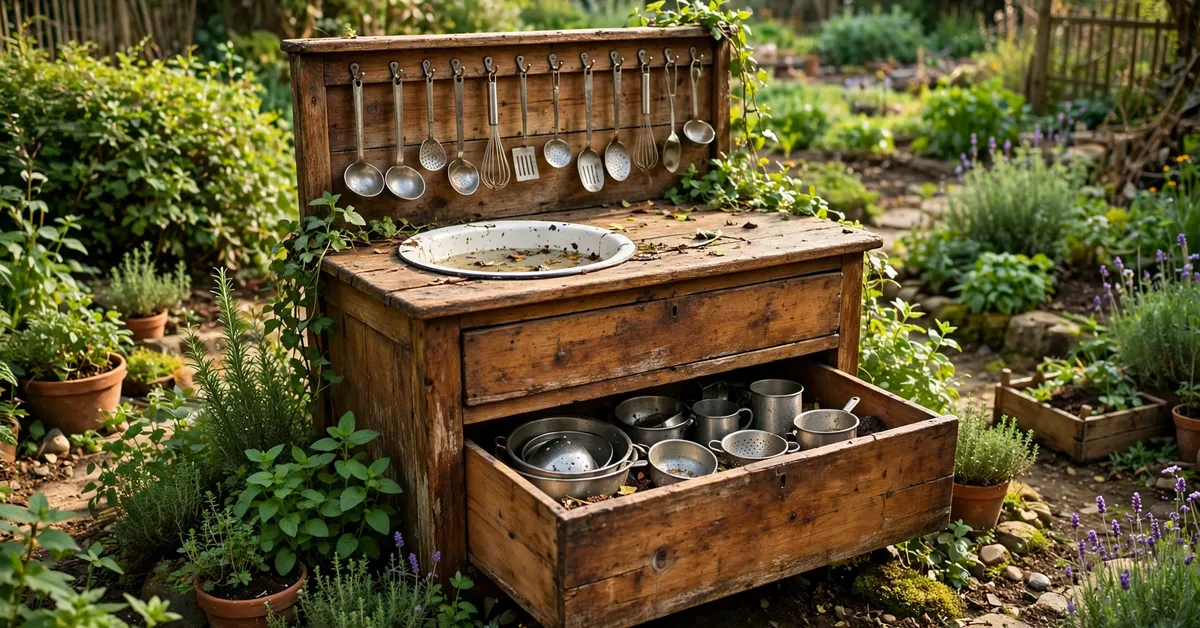
There are three honest ways into mud kitchen ownership. You can buy one, you can build one from raw timber, or you can look at the solid wooden dresser that’s been taking up the garage since the house move and see it for what it is: a mud kitchen that hasn’t been told yet. The potting bench conversion is the garden route into second-hand; this post is the furniture route — dressers, sideboards, changing tables, old desks — and in some ways it’s the better one. Furniture was built to be stood at, worked at and scrubbed, it comes with drawers and shelves already fitted, and the good pieces are made of wood that modern flat-pack can only describe in its memoirs.
The conversion takes half a day, costs about as much as the bowl and the oil, and produces a kitchen with more character than anything in a catalogue. Here is how to choose the right piece, refuse the wrong ones, and do the job properly.
The Best Candidates (and the Ones to Refuse)
The best candidates, in order:
- Changing tables are the gift nobody notices: designed at standing height for an adult, which cut down an inch or two becomes perfect for a four-year-old; they come with safety rails that become the kitchen’s back board, open shelves below, and they’re sold cheap in enormous numbers by families whose babies have opinions now. If you see one locally, stop reading and go.
- Solid wood dressers and sideboards — heavy, stable, drawers for utensil storage, and a top that takes a sink cut-out without complaint. Weight is a feature here: a kitchen a child can’t tip is a kitchen you never worry about.
- Old desks and washstands — washstands are literally pre-mud-kitchen furniture (they held a bowl and jug for a century) and desks give you that useful kneehole that becomes a pretend oven.
Where the good pieces hide: charity shop furniture warehouses (the big ones, where the unfashionable solid wood goes), selling groups in the autumn clear-out, and — honestly — the kerbside on house-clearance days, where a dresser that needs two people to lift is often free to whoever can lift it. Solid wood is out of fashion and heavy, and both facts work in the converter’s favour: the pieces nobody wants are exactly the pieces built well enough to survive a second career outdoors. Bring a tape measure and a friend; the good ones do not wait.
Refuse these, without sentimentality:
- Swollen chipboard or MDF. If the edges are puffy, the laminate is bubbling or the piece smells of damp, it is not a project, it’s compost with hinges. Particleboard plus outdoor water play equals one season and a skip.
- Anything with a racking wobble. The rock test from my second-hand mud kitchen inspection applies exactly: push it hard from the side. Joints are the furniture; a frame that racks is a frame that’s finished.
- Suspect paint on pre-1980s pieces. Old paint can contain lead, and a mud kitchen gets chewed, scraped and sanded by its users. If you can’t be sure what the paint is, either strip it back to bare wood completely (outdoors, masked, and the dust treated as the hazard it is) or walk away and let it be somebody’s indoor problem. This is the one refusal that is about safety rather than money.
The Conversion, Step by Step
- Strip and clean. Remove every drawer, door and fitting. Scrub the whole piece with a stiff brush, warm water and washing-up liquid, and let it dry in the sun for a day — you’re about to learn exactly what you bought, and daylight is honest.
- Cut it down to height. A mud kitchen worktop wants to sit at roughly 50–55 cm for three-to-five-year-olds (the full measurements by age are in my mud kitchen dimensions guide). Saw the legs down evenly — measure from the floor up on each leg, mark, and cut once. Furniture legs are usually more than long enough, which is the entire opportunity.
- Cut the sink opening. Place your washing-up bowl upside down on the worktop, draw round it, then draw a second line about 1.5 cm inside the first — the bowl’s rim sits on that lip. Drill a starter hole, cut the inner line with a jigsaw, sand the edge smooth, and drop the bowl in. It should sit proud and lift out for emptying.
- Sand every contact surface. Worktop, edges, the drawer fronts children will lean on — 120-grit until your palm finds nothing. This is the step that turns “old furniture” into “play equipment,” and it is not skippable.
- Add the furniture of play. Hooks along the back for ladles and whisks (the kit list is in my what to put in a mud kitchen guide), one drawer kept for utensils, one shelf for the dry ingredients, and a towel rail if the piece doesn’t provide one. Remove any old locks, latches or keys — finger traps and small detachable parts have no job here.
- Oil it. One coat of child-safe exterior wood oil (the tin should say suitable for play equipment once cured), worked into the end grain of those freshly cut legs especially. Cure it fully before the opening ceremony.
- The stability shove. Lean on it, push it, rock it — the full test from the mud kitchen safety checklist. A converted dresser should feel geological. If it doesn’t, the feet get levelled or the piece gets retired to the garage with honour.
Costs: The Honest Comparison
Price the conversion against the new market (the current models are compared in my best outdoor mud kitchen for kids roundup, at $50–$150 / £40–£120):
- The furniture: free (yours) to $30 / £25 (bought — changing tables and unfashionable solid dressers are some of the cheapest second-hand objects in the world, because nobody can move them).
- The bowl, hooks and oil: $10–$30 / £8–£25, and the oil tin serves the annual maintenance for years.
- Total: $10–$60 / £8–£50, landing at the bottom of the new-price range for a kitchen that is heavier, storied and made of better wood than most of the range. The honest caveat: your half-day of labour is the real currency here. If weekends are precious and money isn’t, the catalogue exists. If the reverse is true, this is the best-value route in the whole niche.
Making It Weatherproof
Furniture was built for indoors, so the conversion has to add the weather defences a garden build gets by default. Exterior oil is the main one — renew it annually, per the mud kitchen maintenance routine. Stand the piece on pavers or bricks so its feet are out of the standing wet (feet are where every wooden kitchen dies first, indoors-bred ones fastest). Aim drawers to close fully so rain stays out of the storage, and in a hard winter, a cover or a move under shelter doubles the piece’s life. Do all that, and a converted dresser will outlast several purpose-built kitchens — it was, after all, already decades old when you started.
One furniture-specific weakness to plan for: wooden drawer runners swell in damp weather and a drawer that glided in the shop will stick by October. Wax the runners (a candle rubbed along them does it), leave the utensil drawer a fraction open on wet weeks, and store anything that must stay dry — the recipe cards, the café’s paper menus — in a lidded box on the shelf rather than in a drawer. Ten seconds of wax twice a year keeps the furniture behaving like furniture instead of like a swollen door.
FAQs
What furniture makes the best mud kitchen?
Changing tables are the standout — near-perfect height after a small cut-down, safety rails that become the back board, open shelves, and sold cheap everywhere. After that: solid wood dressers and sideboards (heavy, stable, drawers for storage), then old washstands and desks. The common thread is solid wood, a worktop you can cut a sink hole into, and a frame that doesn’t rack when you shove it. Avoid chipboard and MDF entirely.
Is old painted furniture safe to convert into a mud kitchen?
It depends on the paint, and this is the one place to be strict. Paint on pre-1980s furniture can contain lead, and a mud kitchen is chewed, scraped and sanded by its users — so an unknown painted finish must either come off completely, back to bare wood (stripped outdoors, masked, dust treated as hazardous), or the piece doesn’t get converted. Modern painted or varnished solid wood in sound condition is fine: sand the contact surfaces smooth and seal with child-safe exterior oil.
How do you cut the hole for the sink bowl?
Draw round the bowl upside down on the worktop, then draw a second line about 1.5 cm inside the first — that inner line is your cut, so the bowl’s rim rests on the lip and the bowl lifts out for emptying. Drill a starter hole inside the line, cut with a jigsaw, and sand the edge until a palm finds nothing. Test the bowl before oiling: it should sit proud, not wobble, and lift out with two fingers.
How long does an upcycled mud kitchen last outdoors?
Properly converted — solid wood, oiled annually, feet up on pavers out of the standing wet, covered or sheltered in hard winters — five years and well beyond is a fair expectation, and plenty of converted dressers will outlast purpose-built kitchens, having started life as better furniture. The lifespan killers are the same as for any wooden kitchen: rotting feet, skipped oil, and water sitting where it shouldn’t. The maintenance routine on this site covers all three.
How much does it cost to convert a dresser into a mud kitchen?
$10–$60 / £8–£50 in cash: the dresser itself is free (already yours) to about $30 / £25 second-hand, plus a washing-up bowl, hooks and a tin of child-safe exterior oil. Against $50–$150 / £40–£120 for a new wooden mud kitchen, it’s the cheapest route to a full-size kitchen there is. The real cost is your half-day of labour — cutting down, cutting the sink hole, sanding and oiling — which is either the catch or the pleasure of it, depending on the converter.