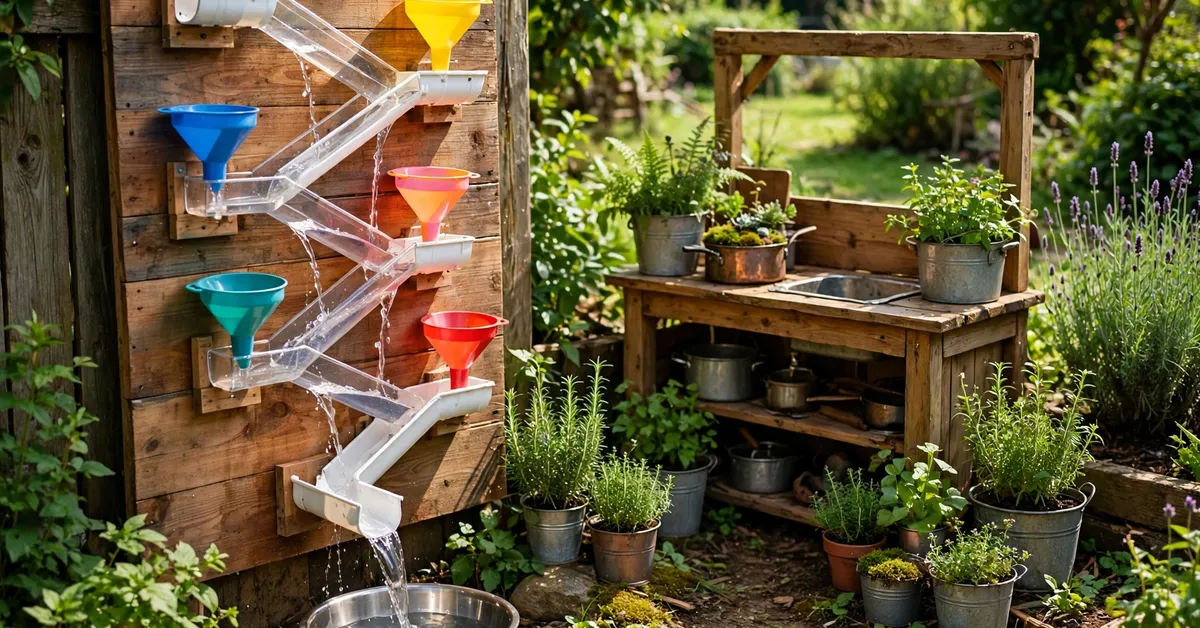
Every mud kitchen has the same bottleneck, and it is one child wide: the tap container. However good your water supply is, the pouring, pumping and filling all happen at one small point, and that is where the queue, the negotiation and the occasional flood form. A water wall is the fix — a vertical board of guttering channels, funnels and tubes, mounted on a fence or a frame next to the kitchen, down which water pours, zigzags and splashes into a bowl at the bottom. It spreads the water play across a wall instead of a point, it costs less than the kitchen did, and on the evidence of ours, it will be fought over with a dedication the kitchen itself rarely inspires.
This is a genuine weekend build: one board, a handful of parts, a jug of water for testing, and a child promoted to chief inspector. Here is the version that survived three summers of inspection.
What a Water Wall Is (and Where It Belongs)
A water wall is a route, not a container: water enters at the top (a funnel, a filled jug, a pump) and travels down through channels, tubes and obstacles into a collection bowl at the bottom — from where it is carried back to the top and the whole economy repeats. The physics a four-year-old absorbs from one (slope, flow, blockage, overflow) is the same physics as the mud kitchen science experiments post, except this apparatus runs all afternoon without adult management.
Site it within a step or two of the kitchen, so the collection bowl doubles as a kitchen water source and the play flows between the two. The three mounting options, in order of effort:
- A fence panel — the easiest, if you have a sturdy fence in the right place and the fence is yours to screw into.
- A pallet or trellis frame — free-standing-ish, can move with the kitchen, and matches the pallet aesthetic if your kitchen is the DIY pallet build style.
- The kitchen’s own back rail — a short wall of two or three channels on the back of a bigger kitchen works beautifully for small gardens.
Height matters: the top funnel should be reachable by your youngest user standing on the ground — for most under-fives that means the fun starts at about 90–110 cm, with the action descending from there. The full heights by age are in my mud kitchen dimensions guide; a wall built too tall is a wall watched, not played with.
Materials and Cost
Everything on this list is hardware-shop standard, and half of it is probably in your garage:
- The board: a fence panel, pallet, or a sheet of exterior plywood roughly 120 × 90 cm.
- Channels: 1.5–2 m of plastic half-round guttering, cut into 3–4 lengths, plus end caps — guttering is the perfect water-wall material: cheap, smooth, and already shaped like a waterslide.
- Funnels: 2–3 in different sizes (kitchen funnels are fine; wide ones forgive small aim).
- Tubes: a metre of clear flexible tube or short hose offcuts for the drops between levels.
- Fixings: gutter brackets or pipe clips for the channels, cable ties for prototyping, stainless screws for the final fix (stainless matters — see Problems, below).
- The reservoir: a washing-up bowl or small bucket at the bottom, and a hand pump or watering can to return the water. A hand pump at the top turns the wall into a recirculating system — the pump options are the ones from my mud kitchen with water pump post.
Cost: $25–$60 / £20–£45 all-in, and close to free if the guttering comes from the recycling pile and the funnels from the kitchen drawer. Against the price of a second water feature, this is the cheapest capacity upgrade in the garden.
The Build, Step by Step
- Mount the board first, solidly. Fence, frame or wall — shake it hard before anything goes on. A water wall flexes under enthusiastic use, and a wobble at this stage becomes a collapse with water in it later.
- Plan the route on the ground. Lay the channels out below the board and design the journey: in at the top funnel, along a channel, drop through a tube, along the next channel the other way, down through the big funnel, home to the bowl. Zigzag beats straight — every change of direction is play value.
- Fix the top funnel and first channel with cable ties only. Everything is temporary until water has voted.
- Set each channel with a gentle fall — about 2–3 cm of drop across its length. Steeper and the water sheets off the end and out of the system; flatter and it pools and stagnates mid-channel. The jug test tells you instantly: pour slowly at the entry and watch.
- Add the drops. Where a channel ends, position the tube or funnel below its lip so the falling water lands in it, not beside it. Half of all water-wall “leaks” are just drops aimed at where the funnel was supposed to be.
- Run the full test with a big jug, top to bottom, twice. Adjust falls, move funnels, re-tie. Only when the whole route runs clean do you swap the cable ties for screws and brackets.
- Fit the collection bowl on a stable base at the bottom — a paving slab or a low crate — so a full bowl can’t be knocked off a wobbly perch by the child emptying it. Then hand over to the inspector.
Making It Recirculate
A wall that needs an adult with a hose is a wall that runs twice a summer. The self-contained version: the collection bowl at the bottom is the reservoir, and the water returns to the top by hand pump (best), watering can (fine, and good exercise in the mud kitchen for toddlers years it’s simply the game), or a bucket-and-jug relay staffed by the children themselves. If your kitchen already has a working tap setup, the wall can share its container — but keep the wall’s own circuit separate if you can; two systems, two games, no queue at either.
One rule transfers from every water feature on this site and it is not optional: the reservoir empties at the end of the day. Standing water is the one real hygiene risk in any water play, and the full reasoning is in my mud kitchen safety checklist. A bowl that gets tipped onto the flowerbeds nightly is a ten-second job; a reservoir left for a fortnight in July is a biology lesson nobody ordered.
Fixing the Usual Problems
- Water escaping at the joins. Usually aim, not seals: the drop is landing beside the funnel. Move the funnel, not the channel. A dab of outdoor silicone fixes the genuinely leaky joint.
- Channels too steep. Splashing out at the ends and emptying in seconds. Reduce the fall; add an end cap as a baffle.
- Channels too flat. Pools forming mid-run and going slimy. Increase the fall slightly — 2–3 cm is the target, and “slightly” is doing real work in that sentence.
- Green slime and algae. Shaded water features grow it; the answer is the weekly scrub from the mud kitchen maintenance routine, plus the nightly emptying rule above. Slimy channels are also slippery channels — another reason the scrub is weekly, not monthly.
- Rusty fixings. Mild steel screws streak and weaken within a season outdoors. Stainless from the start, or accept a re-fixing job every spring.
- The bowl keeps getting knocked over. It’s at toddler elbow height doing a busy job — sink it into a crate or a ring of bricks and the problem mostly retires.
FAQs
How much does a mud kitchen water wall cost?
$25–$60 / £20–£45 all-in from a hardware shop: a board or pallet, 1.5–2 m of plastic guttering with end caps, two or three funnels, a metre of tube, clips and stainless screws, and a bowl for the bottom. It drops close to zero if you raid the recycling — funnels from the kitchen drawer, guttering offcuts, a pallet for the board. The only part worth spending real money on is a hand pump if you want the recirculating version.
Can a water wall work without a hose or an outdoor tap?
Yes — the standard version on this page is exactly that. The collection bowl at the bottom is the reservoir, and water returns to the top by hand pump, watering can or a bucket relay run by the children. A hose makes refilling lazier but adds a permanent water connection you then have to manage; the self-contained loop is simpler, safer, and the carrying is honestly half the play for under-fives.
What age is a water wall for?
Roughly two to eight, with the design moving as they grow. For two- and three-year-olds: fewer, lower channels, big funnels, everything reachable from the ground. From four up, the zigzag routes, tubes and engineering take over — school-age children will rebuild a route to test a theory, which is the wall graduating from toy to apparatus. Set the top funnel at your youngest user’s reach (about 90–110 cm for most under-fives) and let the route descend.
How do you stop a water wall going green and slimy?
Three habits: empty the reservoir every night so nothing stands and stagnates; scrub the channels weekly with a stiff brush (they’re smooth plastic — two minutes); and keep the falls right, because pooling water mid-channel is where slime starts. A wall in full shade grows algae faster, so site it for some sun if you can. Never use chemical cleaners on play surfaces; brush, water and daylight do the job.
Can I attach a water wall to a fence?
Yes, if the fence is yours, sturdy, and the panel doesn’t flex — shake it hard first, because a wall under enthusiastic use multiplies any wobble. Screw the channels’ brackets through the panel into the posts where you can rather than into thin boards alone. If the fence is shared, rented or flimsy, build on a pallet frame instead and stand it against the fence: same wall, no arguments, and it can move when the kitchen does.