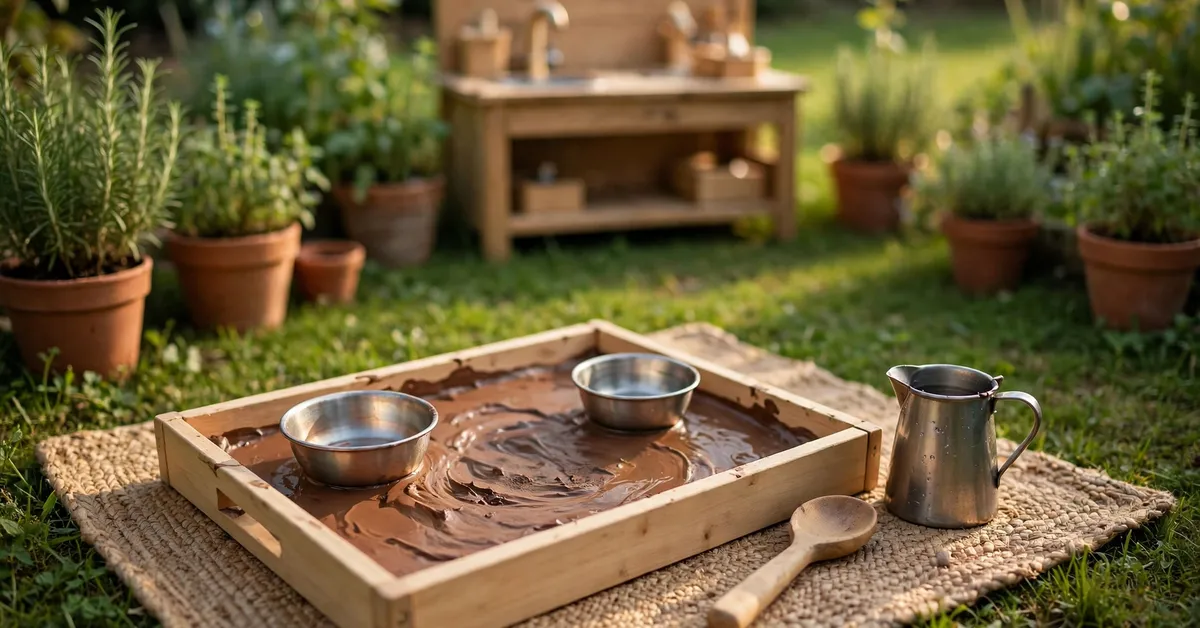
Parents of babies ask me a version of the same question all summer: “She’s nine months old, she watches her brother at the mud kitchen like it’s television — is there anything she can actually do out there?” The instinct is already switched on at that age. Squishing, patting, pouring, banging a bowl and posting handfuls of interesting stuff into other containers: that’s a baby’s whole curriculum, and a mud kitchen is built out of exactly those verbs. What a baby can’t have is the mud kitchen itself — real soil, real standing water, and a worktop at toddler height. This post is the bridge version: taste-safe “mud”, played with at ground level, under rules written for children who taste everything first and ask questions later. It is not a shrunken mud kitchen. It is the honest first stage of one.
Why Babies Don’t Get the Real Mud Kitchen (Yet)
One reason, stated plainly: everything a baby touches goes in the mouth. Garden soil — however carefully sourced — is not food, and the rules in my mud kitchen safety checklist about soil of known origin, fresh water and handwashing exist precisely because older children can mostly be trusted not to eat the café’s stock. A ten-month-old cannot, and no amount of hovering changes that; you will simply spend the session fishing soil out of a small, determined mouth.
The second reason is geometry. A real mud kitchen is worked standing at a worktop, and the heights in my mud kitchen dimensions guide start at toddler scale. Babies play sitting, crawling and pulling up — the play has to come down to their level rather than lifting them to furniture that isn’t theirs yet. Neither reason is a “no”. Both are a “not that version”.
Taste-Safe “Mud”: The Mixes That Actually Work
Taste-safe mud is made in the kitchen, from food, in small batches, and thrown away the same day. Four mixes cover the whole 6–18 month range:
- Cocoa mud — plain flour, cocoa powder and water with a spoon of vegetable oil, mixed to a soft dough that firms up like real mud. Looks astonishingly convincing, smells like a bakery, and is the one older siblings will try to annex for their café. This is the baby’s answer to the real ratios in my how to make mud for a mud kitchen guide — same idea, edible ingredients.
- Oat mud — rolled oats soaked in water until they turn gloopy and squishable. The texture is the point: lumpy, squeezable, and perfect for fistfuls. Cheap enough to make by the washing-up bowl.
- Yoghurt “mud” painting — natural yoghurt with a little cocoa or fruit purée for colour, spread on a tray for finger painting and patting. Best for the youngest sitters, and it rinses off everything, including the baby.
- Chia mud — chia seeds soaked overnight in water turn into a slick, spoonable gel that older babies (12 months plus) find deeply satisfying to stir and pour. Slippery in a way none of the others are.
Two rules govern all of them. Make it fresh, every session — these are foods, and a bowl of oat mud that sat in the sun yesterday is not taste-safe anymore, it’s just old porridge with ambitions. And check your own baby against the ingredients: flour mixes are usually cooked-flour advised for the very youngest (raw flour isn’t recommended for babies — bake the flour for ten minutes first, or use the oat and yoghurt mixes until they’re older), and any food allergy in the family outranks a blog post, including this one.
The Setup: Ground Level, Not Worktop Level
Forget furniture. A baby mud kitchen is a shallow tray, a washing-up bowl sunk into a low box, or a big oven tray on a mat on the grass — the whole station at sitting height, with the baby parked in the middle of it like a tiny foreman. For babies who are pulling up to stand, a low, solid table or the bottom step of the real kitchen gives them something to cruise to; the layout logic is the same as the main mud kitchen setup guide, just lowered until the user’s elbows are the right height, which for now means floor level.
Stock it with the biggest, simplest kit you own: two or three metal bowls, a big spoon, a jug for pouring between bowls, and things from the what to put in a mud kitchen list in their largest, least swallowable editions. Everything gets mouthed, so everything must be too big to be a choking risk and sturdy enough to be banged on the tray in triumph. Add a bowl of clean water at the edge — for rinsing hands, toys and, periodically, the baby.
Site the tray in shade, on a mat or old towel that defines the splash zone, and treat the whole thing as portable: this is a kit that comes out for twenty minutes and goes away again, not a fixture.
One staging tip that changes first sessions completely: set the tray out before the baby arrives at it, with the mix already in and one bowl tipped invitingly on its side. A baby lowered into the middle of a finished, interesting-looking scene investigates it; a baby who watches you assemble equipment investigates you instead, and by the time the mud is ready the audience has crawled off to examine a leaf. Bring the baby to the play, not the play to the baby.
What Babies Actually Do With It (and Why Bother)
Nothing that looks like cooking. A baby at a tray of cocoa mud pats it flat, lifts a fistful and studies the escape between their fingers, transfers it lump by lump into another bowl, and bangs the spoon because the spoon is there. That is not a failed mud kitchen session — it is exactly the sensory and motor work this age is for, and the developmental case behind it is the same one made properly in my mud kitchen benefits post: babies learn texture, weight, cause and effect with their hands and mouths long before they learn anything with their eyes alone.
The honest reason to bother is simpler. The baby is out there anyway, watching the big kids. A tray of their own converts spectating into playing, keeps them out of the toddler’s soup production, and builds the association early: this corner of the garden is where the interesting squishy stuff happens. Children who start on a tray tend to walk up to the real kitchen at eighteen months like returning regulars.
If There’s an Older Sibling at the Real Kitchen
Run both stations at once, in sight of each other, and give the older child the dignity of being the head chef while the baby holds the branch office. The systems that stop the big one annexing the baby’s bowls — and the baby crawling through the big one’s café — are the same ones that govern any shared kitchen, and they’re written up in my mud kitchen for siblings guide: duplicate the pinch-point tools, one personal hook and towel each, and clear territory for both. The baby’s territory is the mat. Defend the mat.
The Rules for Under-Ones, in One List
- An adult within arm’s reach, the whole session. Not “in the garden” — at the tray. Taste-safe ingredients reduce the risk; they do not supervise anybody.
- Fresh mix, fresh water, every time. Yesterday’s batch goes in the bin or the compost, never back in the tray.
- Sessions are short. Ten to twenty minutes is a full shift for a baby; end while it’s still a pleasure, before tiredness turns it into a full-body mud application.
- Skin first. If your baby has eczema or broken skin, keep sessions shorter, rinse hands straight after, and skip any ingredient they’ve reacted to before.
- Nothing standing. No bowls of water left out after the session — the standing-water rule applies to the baby kit exactly as to the big kitchen.
FAQs
Is mud safe for babies?
Real garden soil is not, for under-ones — not because soil is poison, but because babies eat everything they hold, and soil can carry bacteria and residues that a baby’s system doesn’t need. Taste-safe mixes made from food, prepared fresh, are the safe version of the same play: squishing, patting and pouring with ingredients you would serve at the table. Once a child reliably stops mouthing everything — usually somewhere in the second year — the real kitchen opens up.
What can I use instead of mud for a baby?
Food-based mixes: cocoa mud (flour, cocoa, water, oil), soaked-oat mud, yoghurt for tray painting, and chia gel for babies over twelve months. Each gives a different texture — firm, gloopy, smooth, slippery — and rotating them across the week is half the fun. What they share matters more: made fresh that morning, thrown away that evening.
At what age can a baby start mud kitchen play?
As soon as they can sit steadily and reach for things — typically around six months — in the taste-safe, ground-level form in this post. Start with yoghurt or oat mixes on a tray for ten minutes and let the sessions grow with the child. Standing at a real worktop with real soil belongs to the toddler stage; there’s no prize for rushing the calendar.
How do I clean up after baby mud play?
In order: strip the baby at the tray’s edge (everything they’re wearing is already committed), warm-water wash for hands and face, and the clothes straight into a soak. The tray and bowls wash like any kitchen equipment — they are kitchen equipment. The mat shakes out over the flowerbed. Whole operation: five minutes, which is the correct budget for it.
When should my baby move to a real mud kitchen?
When three things line up: they’re standing and steady at a low worktop, they’ve mostly stopped tasting the stock, and they can manage a session with the wash station as part of the game rather than an emergency. For most children that’s somewhere between 15 and 20 months. The full toddler version — heights, kit, and the safety edit for that age — is in my mud kitchen for toddlers guide, and it’s the natural next read after this one.